Web deploy can be used to upload a site developed through Visual Studio to the web server. Using web deploy can help avoid issues like missing assemblies that might occur when uploading a Visual Studio project via FTP.
For Core projects using Framework 2.x or later, the module name has changed from AspNetCoreModule to AspNetCoreModuleV2. Additional information regarding Core Module AspNetCoreModuleV2 is found after the Publish section.
Set up a publish profile
In Visual Studio, right click the project and select Publish from the menu.
Select Web Server (IIS) as the publish target then Next.
Select Web Deploy as the Specific Target then Next.
The web deploy connection settings required are
Server: wdeploy.everleap.com
Site name: a series of digits separated by a hyphen (see Web Deploy Pane below); if deploying to a subdirectory, it is included in the site name, ie 1234-56789/subdirectory
User name: SiteName\UserID (see Web Deploy Pane below)
Password: the FTP / Everleap Control Panel password
Destination URL: optional and can be left blank; for visiting the site after successful deployment
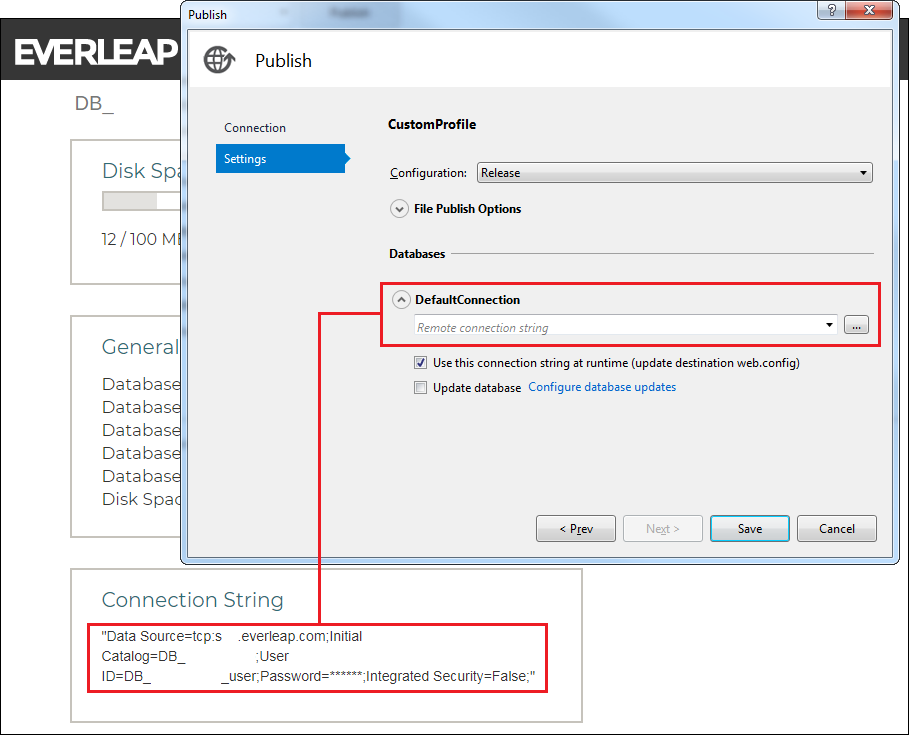
If there is a database, click Next to set up the connection string. If not, click Finish.
Web Deploy Settings
The connection settings for Web Deploy can be reviewed on the applicable Site Overview page. Found at Everleap Control Panel > Sites (
https://cp.everleap.com/sites/) > Manage (if multi-site plan) > select Web Deploy from the bottom pane
Connection String
If a connection string is required for the deployed project, an Everleap database connection string can be found at Everleap Control Panel > Databases > Shared MS SQL (or Private MS SQL) > Manage (applicable database). Note that the example Connection String does not contain the database password in plain text, so it will need to be updated after copying it to Visual Studio. After adding the connection string, Save.
Core Publish Settings
Deployment Mode is typically set to Framework-dependent for supported versions found on the following
Knowledge Base Article. Self-contained deployment is selected when a newer version of .NET has not yet been rolled out to a site's web server. In some rare cases, Self-contained deployment will also be used to include dependencies for an otherwise supported version of .NET.
Target Runtime is best set to win-x86 to match the site's app pool, which defaults to 32-bit. Portable causing compilation on app startup, which can impact performance for larger apps.
Core Hosting Model defaults to InProcess for deployed apps. If attempting to run more than one app from a single app pool, all Core apps will need to be changed to OutofProcess (case insensitive). The hosting model can be changed by updating the .csproj file (left click on the Project name in Visual Studio) and add the following to the PropertyGroup:
<AspNetCoreHostingModel>OutofProcess</AspNetCoreHostingModel>
Publish
After saving the publish profile, the left pane in Visual Studio should update. Click Publish to deploy the project to the web server.
Core Module AspNetCoreModuleV2
The module name changed from AspNetCoreModule to AspNetCoreModuleV2 when Core Framework 2.x was introduced. Due to the way Azure Pack provisions sites, this can affect older sites and will return the following error
To resolve the issue for a deployed app, download the web.config via FTP and add the module as in the syntax below, then upload the updated web.config back to the site.
<configuration>
  <system.webServer>
    <modules>
      <remove name="AspNetCoreModuleV2" />
      <add name="AspNetCoreModuleV2" />
    </modules>
  </system.webServer>
</configuration>
For reference, the completed web.config for a Core project with the added module would look similar to the following.
<?xml version="1.0" encoding="utf-8"?>
<configuration>
  <location path="." inheritInChildApplications="false">
    <system.webServer>
      <modules>
        <remove name="AspNetCoreModuleV2" />
        <add name="AspNetCoreModuleV2" />
      </modules>
      <handlers>
        <add name="aspNetCore" path="*" verb="*" modules="AspNetCoreModuleV2" resourceType="Unspecified" />
      </handlers>
      <aspNetCore processPath="dotnet" arguments=".\CoreApplication.dll" stdoutLogEnabled="false" stdoutLogFile=".\logs\stdout" />
    </system.webServer>
  </location>
</configuration>
To prevent the issue on deploy, a web.release.config can be added to the project with the following syntax.
<?xml version="1.0" encoding="utf-8"?>
<configuration xmlns:xdt="http://schemas.microsoft.com/XML-Document-Transform">
  <location>
    <system.webServer>
      <modules xdt:Transform="InsertIfMissing">
        <remove name="AspNetCoreModuleV2" />
        <add name="AspNetCoreModuleV2" />
      </modules>
    </system.webServer>
  </location>
</configuration>
Press Ctrl+Shift+A or right click on the project name, hover over "Add" then click "New Item...."
In the name field enter "web.release.config" then "Add" the file.
Left click the new "web.release.config", enter the markup above and Save to add the module name to the web.config on deploy.